Monday, July 18, 2011

Garage Sale Finds

I decided to go garage saling this weekend (like I need more stuff to sit in my craft area untouched... but I promise to get to it all very soon) because I really needed some lamps. I had a really successful day! I got this lamp (ignore the shade), little bird, cookie jar, floor lamp, bread box (a project for a friend) and a floor lamp. The best part is that I only spent $13.00!!! I can't wait to start on getting it all refininshed!


Sunday, July 17, 2011

Vintage Newspaper Holder

I have wanted one of these for a really long time and even though it is only about $10.00, I knew with it being round, I didn't really have a place to hang it. So, my solution was to make one for cheaper than $10.00 and also one that could sit on a shelf!


I started with this 4" craft wood from lowes: (It was around $4.00)


I cut down the strip of wood into (4) 12" pieces. These are some of the other supplies you will need:


Next, I glued one of the pieces to the other with the liquid nails and let it sit until it set up, then I repeated with the other two pieces.


(Psst. I was very proud of myself for letting it set up because I am EXTREMELY impatient when it comes to craftng because I get sooooooo anxious to see the results... its a horrible weakness!)


Once I had two sets of the two pieces glued together, I glued the two sets together to make a box. Once this had set up, I sanded all of the edges.


Next, I painted the box black.


I then painted "New York Times" on the box.


I drilled holes into the top of my box and then sanded it all again.


The last step was to put the wire into the holes and wahalla I was done! It was very easy and about half the price as the one I originally liked!


Here it is on my entry table!


Thursday, July 7, 2011

Roman Numeral sign


I love all of the accents out there with the roman numerals! I have seen a lot at the pottery barn and then some online so I decided to make my own. I happened to have this piece of scrap wood that is about 2' long so I painted it white and then painted on the letters. I sanded it down pretty good and I plan on putting it on either a shelf in my living room or in the dining like in the picture!


Very Easy!!!


Thrift Store Find!

I have been praying to come across one of these little babies for a long time so when I came across it for 5 dollars today at the thrift store, I picked it up immediately! I couldn't wait to get it home!


The first thing I did was paint the wooden base black. I had a couple of different ideas floating around but as soon as I thought of painting polka dots on the glass, I knew what I wanted to do for sure. I used a really cool tool that I found in my moms craft room since I was at her house today. (She has more crafting stuff then the craft store...) I really need to find me one of these because it made the dots EXTREMELY easy!


Next, I chose the ribbon and decided to pick out an embellishment to attach as well. She actually does have her craft room kind of set up like a store so I quickly found some really cool skeleton key embellishments and chose one to use.


I looked through this stash of ribbon...


And then this one...


And then finally found some in this one... (believe it or not, there is two more stashes...)


After everything was dried and tied on, I was done with probably one of the easiest projects I have done in a while and I could not be happier with it!


Saturday, July 2, 2011

Outdoor Thermometer!


I have really been wanting a thermometer for my back porch but don't want to pay an arm and a leg. I found some really cute ones at hobby lobby for only 9.99 which I could have got for 50% off; however, I live in the Texas panhandle and you just cant leave light weight objects outside or they will very quickly be blown to oklahoma! I needed something sturdy so this is what I did:


I found this BIG thermometer at the dollar tree and then bought the large wooden plaque at hobby lobby for 50% off! Cheap!!


First thing I did was paint the wooden plaque. I am about to repaint my house and I know the shutters are going to be black so I went ahead and painted it black, trying to plan ahead! (yes, I put things on soup cans to paint.... that a whole other post tho!)


About half way through painting, I realized I hadn't drilled holes so I went ahead and did that. I knew I was going to be using ribbon so I did a little bit of a bigger hole that I would normally do.


This was the first paint job I did... which I loved... because I loooooovvvvvveeeeee mamoth ANYTHING! .... but once I got to the next step, my entire design was covered up and it made no sense. So I had to sand it down and regroup...


This was my second paing job. This time, I was sure to figure in room for the thermometer.


Next, I tied a cute little bow through the two holes and curled the ribbon. I tried to glue the thermometer using gorilla glue but it just wasn't working out and I am pretty sure I just got impatient waiting for it to dry so instead, I ended up attaching the thermometer with 3Ms removeable velcro strips. I also used the strips to hang it up outside.


Tuesday, June 21, 2011

Mini Flag


A while back, I made a small sign holder to place on my buffet and change out seasonally, you can see it here. I hadn't made anything patriotic for it yet so I decided to make a distressed flag.


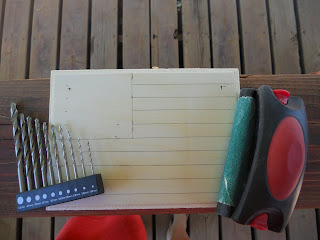
I started out with a small wooden plaque that I buy from walmart for only.97. I used a ruler to measure for the lines and drew them on with a pencil. As you can see in the picture, I made the blue box, 2.5"x 3" and the lines .5".


The next step was to drill the holes for the wire so that it will hang. I have used these plaques for a lot of different things and I have found that if you try to make a very big hole, the plaque will split so I used a 1.98mm bit. Next you want to sand any rough areas. Its important to do all of this before you paint, just in case it does splinter.


Here it is on my sign stand (sorry its a little blurry):


Inspired again

I came across a new blog today that I had never seen, her name is ginger over at ginger snaps and she has the best ideas! I had been trying to find a super cute idea for some 4th blocks but was hitting a wall when it came to my own ideas, that is when I saw hers that you can see here. I loved them (she is so clever) and so I decided to make some of my very own and here they are: