Tuesday, June 21, 2011

Mini Flag


A while back, I made a small sign holder to place on my buffet and change out seasonally, you can see it here. I hadn't made anything patriotic for it yet so I decided to make a distressed flag.


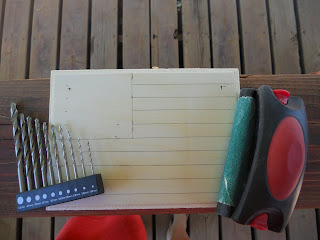
I started out with a small wooden plaque that I buy from walmart for only.97. I used a ruler to measure for the lines and drew them on with a pencil. As you can see in the picture, I made the blue box, 2.5"x 3" and the lines .5".


The next step was to drill the holes for the wire so that it will hang. I have used these plaques for a lot of different things and I have found that if you try to make a very big hole, the plaque will split so I used a 1.98mm bit. Next you want to sand any rough areas. Its important to do all of this before you paint, just in case it does splinter.


Here it is on my sign stand (sorry its a little blurry):


Inspired again

I came across a new blog today that I had never seen, her name is ginger over at ginger snaps and she has the best ideas! I had been trying to find a super cute idea for some 4th blocks but was hitting a wall when it came to my own ideas, that is when I saw hers that you can see here. I loved them (she is so clever) and so I decided to make some of my very own and here they are:


"LOVE" Blocks

I was walking through hobby lobby a few weeks ago when all of a sudden it hit me!!! I got the idea for this block set which is actually nothing spectacular except for the fact that I am extremely crazy about houndstooth right now.... so I HAD to make it!


I know what you are thinking, "you've seen one block set, you've seen em all", but I really liked the way they turned out so I had to show them off! I actually don't really have a place for them but seeing as how my mom also fell in love with them, they are about to be packed up and moved to her house. She has a craft room that makes you feel like you have just walked into a craft store on crack so I promised her the blocks in exchange for a little shopping in her room! I probably came out on the better end of the deal but don't tell her that!

Monday, June 20, 2011

BHG Lovelies


I was just strolling around on Better Homes and Garden website and came across some really cute ideas that they had and I wanted to share some of my faves:


I have been seeing a lot of red, white and blue, color combinations that people have adapted the shades to match their decor instead of going with the traditional basics. I think its a really great idea, especially if you want to keep your patriotic gear up all summer!


source: bhg


I absolutely love this bunting! I feel like it is something I could use on my own porch and make it mine and unique! I might have to try to make that one!


source: bhg

I really like the "column-like" piece in the back. I think its very cool and very diy doable!


source: bhg


This one stuck out to me because of the wagon. It would be super cute in a garden with some potted plants in it!


source: bhg


I just liked the way this tablescape turned out. Very cute.


source: bhg

I hope that maybe I can get some tutorials going very soon on some of the inspiration I got off of here!


2x4 Fire Crackers!!!

I came across a very cute idea over at oopsey daisey! I loved he firecrackers and decided to make some of my own! Here are mine:


The sizes that I cut my wood was 8", 10" and 12". I used scrapbook paper from Michaels Craft Store and of course I used modge podge! I cut out the star with my cricuit and the black bead in the middle is a furniture brad. Hope you like it!

Saturday, June 18, 2011

2x4 Flag

I came across the cutest 2x4 flag idea over at brown paper packages. I had to make myself one and I thought I would show it off a little!


It was suuuuuuuppppppeeeeerrrrr easy and I was very pleased with how it turned out!


Summer of projects!


So I have decided to really crack down on my crafting! My house is desperate so I need to get serious! You would think that being a stay at home mom would allow for plenty of crafting time but it is definitely not the case!!!


Anyways...


Me and my neighbor, Kandus, have decided to hold each other accountable and work together to get some much needed projects done around our houses. What was our first project??? Her office!


Her husband, Jason, was going to be out of town for four days so we decided to get serious and surprise him.


Here is the before:


The people that lived there before attempted to do the paper bag texture on the walls (where you glue crinkled up paper bag on the wall) and although it can be a cool texture, they did not due it right and they also put it in about HALF of the rooms in her house.... it needed to go! We later discovered the reason that they had done this texture, was to cover up the fist sized holes that someone had put in the wall... thats right, they stuffed wrapping paper into holes and covered over it with brown paper bag... classy!


So on day one, we got to peeling... and we peeled... and peeled:


After you peel off the big pieces, you have to wash off the smaller pieces and all of the glue... oh the glue! Then we primed:


Next we painted. We decided to do a deep color on the bottom and a lighter on top to give the room some depth but not make it feel smaller. She also wanted to put a chair railing up with some baseboard to create clean lines. Here is the finished project: